Wednesday, 16 November 2011

Recipe: Rainbow Velvet Cupcakes


Time for even more yummy treats! These rainbow velvet cupcakes are probably the fluffliest and spongiest I have ever tasted. The cupcakes themselves aren't too sweet actually but the vanilla frosting definitlely is - both combined is simply delicious though! The cakes all have different colours but you can't tell from the outside.. you'll have to wait until you take your first bite to see what one you got! :)

This is what you'll need to make 12 little Rainbow Velvet Cakes:
  • 125g self-raising flour
  • 1/2 tsp baking powder
  • 75g caster sugar
  • 90ml oil
  • 1 egg
  • 1/2 tsp white wine vinegar
  • 1/2 tsp vanilla extract
  • 70g natural yogurt
  • 2 tbsp milk
  • food colouring

Preheat your oven to 175°C and line a muffin baking tray with 12 cupcake cases. In one bowl, mix all the dry ingredients together, and in another bowl, mix the wet ingredients. Then slowly combine the two and mix until well combined. If your mixture feels a little too dry, simply add another splash of milk. Divide your batter in small bowls and tint with your chosen food colourings. I used pink, blue and green, but it's completely up to you how many and which colours you use! Spoon your mixtures into the cupcake cases until two-third full and bake in the oven for about 20 minutes. To check if they are done, insert a wooden skewer into one of your cupcakes and if it comes out completely clean (no crumbs!), you can take the cakes out and leave them to cool on a cooling rack :)


Because the cupcakes aren't really that sweet, I used a (very sugary) vanilla icing and went a little crazy with the sprinkles haha! The icing is very easy and quick to make, and this is how:
  • 135g sifted icing sugar
  • 40g unsalted butter
  • 10ml whole milk
  • a few drops of vanilla extract
Slowly(!) mix all the ingredients together until light and fluffy - this should take about five minutes. You can either spoon the icing onto your cupcakes (the way I did it) or use a piping bag for a nicer and tidier finish. Add some sprinkles if you like, or leave your cupcakes plain, and then ENJOY! :)

Tuesday, 15 November 2011

Sleek Bad Girl i-divine eyeshadow palette


Hi dolls! How are you all doing? Yesterday I promised you a review and some swatches of my new Sleek Bad Girl eyeshadow palette - here it is! :) I bought this palette at Superdrug for a mere £6.49, that's about 50p per eyeshadow... a total bargain if you ask me! I love the plain black packaging with the big logo written across it - very sleek and therefore very fitting! Also, there is a huge mirror in the lid which is always a plus. But now onto the eyeshadow themselves...


The Bad Girl i-divine palette features a great mix of dark shades: grey, blue, green, purple and black, but also two highlighters which I really like as you wouldn't even need to use any other eyeshadows to do your eye make up. All shadows are super soft and silky, and apart from two (Underground and Twilight) they are extremely pigmented.. And I really mean that! I have swatched them without an eyeshadow base and wow, they looked brilliant! When I wore them for the first time yesterday, I went without a base again and the colours stayed put all day, didn't fade or crease at all - simply amazing!


Five of the twelve eyeshadow are matte: the blackest black I have ever seen (Noir), the two blues (Obnoxious and Abyss) and the two purples (Twilight and Rebel). Matte shadows tend to be a little patchy but there was only a single one in this palette that caused me a little bit of trouble: Twilight. I used it for my purple smokey eyes yesterday, and it really is a lovely shade but even after lots of blending it still looked a bit patchy. But that is the only negative thing I can say about the Bad Girl palette! The other seven shadows are shimmery, so all in all I think you get quite a good mix and there are hundreds of different looks you can create with this palette!
The pictures below show you swatches of the top row (on the left) and the bottom row (on the right) without flash:


For me, this really is the perfect eyeshadow palette - I love wearing darker shades and smokey eyes, as I still haven't found any brown or nude shades that look nice on me. I think this palette offers a great mix of colours and finishes, all highly pigmented and silky and a pretty and sleek packaging - all that for only £6.49... A huge thumbs up from me! :) Mona xx

top row and bottom row with flash

Monday, 14 November 2011

Twilight, Underground&Gullible


On saturday I had a couple of spare minutes before work, so I popped into Superdrug to pick up my favourite mascara (Maxfactor False Lash Fusion) and concealer (Maybelline Pure Cover Mineral Concealer) as they are both nearly empty. As Superdrug has got a 3 for 2 across all cosmetics on at the moment I could choose a third product 'for free'... After walking around the aisles (wanting to buy about twenty different things) for ages I finally made up my mind and went for the Sleek 'Bad Girl' i-divine eyeshadow palette. I love it - lots of beautiful dark shades, some of them are shimmery, some are matte, and they're perfect for creating smokey eyes. I have already prepared a review and swatches of the palette which will be up here tomorrow :)
I couldn't wait to use my new palette for the first time but having 12 shades to choose from didn't make it an easy decision haha! I liked the thought of a purple smokey eye with 'Twilight'. Unfortunately it is quite patchy which you can see on the close-up picture below, but I'm quite happy with the way it turned out overall!


These are the other products I used for this look:
  • Sleek Bad Girl i-divine palette 'Twilight', 'Underground' (crease) and 'Gullible' (inner corner and browbone)
  • Essence Longlasting Eye Pencil 'Black Fever'
  • MAC Fluidline 'Blacktrack' gel eyeliner
  • Maxfactor False Lash Effect Fusion mascara

Sunday, 13 November 2011

Metallic Lace Nails with Konad


Hello lovelies - and a very warm welcome to all my new readers! What a great feeling to log on and find out that my followers have almost doubled - thank you so much! :)
Today, I have got another Konad manicure to share with you! I really enjoyed using my stamping kit for my 'Minty Leopard' nails a few days ago (after neglecting it for a good few months) which is why I decided to give it another go today. I absolutely loved wearing Topshop's 'Eyes of Steel' and I thought it would look great with some black, but choosing a pattern was a slightly more difficult task - I just could not make up my mind (zebra stripes, checked, polka dots, leopard again...) but in the end I went for a lace pattern from the M71 plate. Luckily, it also turned out a lot tidier and neater than my last attempt!


I used Topshop Nails 'Eyes of Steel' as my base colour, P2 Colour Victim 'Eternal' for stamping and sealed it with a coat of Catrice Quick Dry Topcoat.


All i can say is that I really do love it - fingers crossed it will stay on nicely for a few days! What do you think? :) Mona xx

Saturday, 12 November 2011

Recipe: Christmas Biscuits


Hello lovelies,
do you remember the cupcakes I made a few days ago? On the same day, I also baked some biscuits but they were only around for a few hours before me and Kev digged in... they were delicious! The recipe I followed (and tweaked a little) is actually taken out of a Christmas cook book, but hey, is it ever too early for Christmas treats?!

Christmas Biscuits (around 30, depending on the size of your cutters):
  • 135g plain flour
  • 65g unsalted butter (at room temperature)
  • 65g icing sugar
  • 1 egg
  • 1/2 tsp vanilla extract
  • 1/4 tsp lemon extract
Mix all the ingredients together, preferably with your hands, until everything is smooth and combined. Roll it into a little ball, wrap it in some cling foil and leave it in the fridge to cool and set for half an hour.


Now, onto the fun part! Sprinkle some flour on a clean kitchen surface or big chopping board and use a rolling pin to roll out the dough. If the dough sticks to your rolling pin, just sprinkle on more flour or pop it back into the fridge for a little longer - the colder the dough, the easier it will be to work with it. It's really important to roll out the dough evenly to ensure that all biscuits need the same time to bake, otherwise you'll end up burning the thinner ones or undercooking the thicker ones. Then, use your cutter (I had to use a glass as I couldn't find any in Tesco haha!) to cut out your biscuits, place them on a baking tray lined with baking paper, then roll out the leftover dough again, cut out more biscuits, and so on, until you used up all of your dough. Bake them in a preheated oven at 200°C for around 7 minutes or until the biscuits start turning slightly golden.


Leave your biscuits to cool completely before decoarting them - my favourite part! This is where you can go crazy! I kept mine quite simple though, covering half of them with a pink glacé icing and sprinkles, and the rest simply got dipped in melted milk chocolate.


For the glacé icing, you only need to mix some sifted icing sugar with a few drops of water until creamy, but not too runny (in that case, just add some more icing sugar). I added some drops of pink food colouring to make them look more fun - you could also add a little bit of lemon, almond or vanilla extract or flavourings, or whatever you fancy! Spoon a little bit of icing on your biscuits, add sprinkles and leave set and then ENJOY! :)


Friday, 11 November 2011

Minty leopard


Three days ago I chose one of my favourite polishes for my nails - Barry M 'Mint Green'. A beautiful mint green (suprise, surprise!), great formula, quick-drying and opaque in two coats - all that for a tiny £2.99 price tag... What more can you ask for? I absolutely love Barry M's polishes, for me they definitely are the best budget nail polishes out there. I already own ten shades but more will follow, no doubt about that!


After wearing the polish for two days, I got a little bored of it but I didn't have enough time to take it all off and paint my nails in a different colour. I remembered that my Konad stamping plates are lying in one of my drawers, so I thought I'd give it a go! I haven't used them for more than half a year but that will definitely change now - such a quick and fun way to jazz up an old manicure rather than taking it off completely!


I used Konad's Special Polish in white and the stamping plate M57 to create this manicure. I have to admit, it's really not my best attempt but I guess it turned out okay considering I haven't used my stamping kit for more than half a year :) I finished it off with a coat of Catrice's Quick Dry topcoat for extra glossiness and to seal it. Oh, and excuse the tip wear - it's already day three!

Have you ever tried Konad? What do you think? Love, Mona xx

Thursday, 10 November 2011

Passion


It's rainy, grey and very cold outside - such a miserable day! In my opinion, there is no better way to brighten up a gloomy day like this with a bold lipstick. I opted for a bright pink called 'Passion' by BeautyUK, a very glossy and highly pigmented lipstick which I find ideal for a quick and fuss-free statement lip! Amazing lippie - proper review about it will follow soon. I kept the rest of my make up rather simple: a little bit of grey and black eyeshadow and rosy cheeks. These are the products I used:

Face: No7 Quick Cover Blemish Stick 'Extra Fair', Bourjois Healthy Mix Foundation #51, Rimmel Stay Matte Powder 'Transparent', Catrice Defining Duo Blush 'Pink Grapefruit Shake'
Eyes:  Alverde Baked Eyeshadow 'Silky Grey', Essence Duo Eyeshadow 'Newcomer', Artdeco Eyeshadow #27 for highlight, Essence Longlasting Eye Pencil 'Black Fever', Maxfactor False Lash Effect Fusion mascara
Lips: BeautyUK 'Passion'


I'm aware of how bad my hair looks at the moment.. I usually get my roots bleached every 3 weeks as I hate the way my hair looks when my natural, darker hair colour starts to come through. Unfortunately, I just didn't seem to have the time (and money) to go to the hairdresser's in the last few weeks which is why my roots look horrendous now. However, my lovely mum booked me an appointment with my favourite and trusted hairdresser for when I'm back home in Germany in two weeks, yay! Anyway, the whole point in writing this was to ask if any of you have experience with bleaching your roots at home? I'm just too scared to try it as I will probably just mess it up completely haha! Or what about John Frieda's Go Blonder Lightening Spray? Any good?


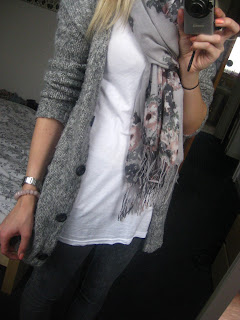
And last but not least, this is what I wore today! As it is getting a lot colder now, I love wearing scarves and thick, knitted cardigans to keep me warm and cosy. I'm still looking for a new winter coat and some boots though. I am not a huge fan of UGGs but they're just so so so warm and super soft, so I might actually get a pair.. my feet would love me for that!

Mona xx